-
Winter camping in sub zero temperatures is not something you should commit to light heartedly. It requires lots of planning, and very specific knowledge and equipment. Neglecting anyone of these can have dire consequences. I don’t say this to scare you, or for shock value. In reality you are going to a very hazardous environment so best to be prepared.
Here’s the disclaimer, I’m not an expert. However I have some experience, I’ve done a lot of research and by way of this blog post I want to share my total knowledge thus far. I have camped in sub zero temperatures a total of four times. The first a very cold solo trip to Tasmania (two horrible nights sleep), then on a snow craft course in Kosciuszko (two good and warm nights sleep), and twice in Southern French Alps (ok nights sleep). Each night spent camping in sub zero temperatures has given me chance to refine techniques and hone my knowledge. So read on and get prepared.
EQUIPMENT
First up let’s talk about gear. With winter camping it is imperative you have the right gear. As with photography equipment it is a case of ‘buy right, buy once’. You may regret having a ‘that’ll do’ mentality or being cheap when buying winter camping equipment. That’s not to say you need to buy the most expensive of everything, just be smart and spend you money where it matters or hire the things you are less likely to reuse.
CLOTHING
Staying warm and dry (the main aim) in a cold environment requires clothing that allows us to both regulate body temperature and protect us from the elements. Surprisingly getting too warm in this environment can be very dangerous. When on the move we need to keep cool as sweating and being wet will sap body heat at a massively accelerate rate in this environment.
Water conducts heat away from the body 27 times faster than air.
So with this in mind take your time, have regular stops, remove and add clothing as you go to regulate your temperature. Air is actually a fantastic insulator so trapping it between layers is the key to staying warm.
Your winter hiking mantra while on the move: Start cold and stay cool, but not freezing of course!
The important thing is to remain dry as you move, then conserve body heat by adding layers as soon as you stop. You’ll soon notice the cold when you stop moving, be sure to add layers as soon as you stop. Being wet at this point means your body has to work very hard to maintain body heat, consuming the calories you should otherwise be conserving. If you are sweaty, do some light exertion to keep your body temperature up whilst drying off.
So here’s a break down of the layers:
UPPER BODY
Base Layer
Get yourself a good pair of thick thermals made from a synthetic fabric. Synthetic fabrics are fast wicking allowing sweat to pass through the layers and evaporate. Cotton is not fast wicking so sweat will easily build up.
Mid Layer
A good tight fitting insulating fleece is perfect for a mid layer. I have a ‘RAB Power Stretch pull on’ which is stretchy (great for hiking), has thumb holes to minimise gaps exposed to the cold when wearing gloves, a high collar to keep your neck warm, and a zip half way down the front, great for venting heat when on the move.
The base and mid layer should be sufficient to keep you warm when on the move. If it is raining or snowing it’s important to keep dry so have a waterproof shell layer to hand.
Shell Layer
To stay dry we need a good waterproof jacket made from Gore-Tex or similar. It doesn’t need to be insulating, it just needs to keep you dry. If you wear a snowboarding or ski jacket, check how waterproof it is before you set off. I suggest purchasing a waterproofing spray from your local outdoors shop and giving your jacket a spray in advance. If the jacket is waterproof, water should bead on the surface and roll off.
A great buy would be a waterproof poncho that doubles as a tarp (I don’t have one). If you need an emergency shelter whilst away from your tent, or you use a Bivi instead a tarp is very useful to protect you from the elements. If anyone finds one for the fashion conscience please let me know…
Insulating Layer
As soon as you stop and presuming you aren’t too sweaty, now’s the time to put on your warmest layer. Once stationary put this layer on as soon as possible to conserve body hear. You will use unnecessary calories warming yourself up if you don’t.
For a trips up to a week in length, a down insulated jacket will provide the best insulation. Buy yourself a high quality down jacket, with plenty insulation and a hood. You will not regret spending money here. They pack down and weight next to nothing.
For trips longer than a week a synthetic material works best. In cold and wet environments, down will absorb moisture over time and become less insulative.
I have North Face Summit Series 800 fill goose down jacket. It has a fantastic loft of down (800 is up there with the best) however the fill weight isn’t that high. In retrospect I would have preferred something a bit warmer and with hood.
Head / Neck
I have an amazing but incredibly unfashionable Gore-Tex hat that covers my ears and neck. It’s nice and soft on the inside, waterproof on the outside and has a small peak to shade me from the sun. Around my neck I have a neck gator which I find more practical than a scarf (I love the thing, really recommend one). I tuck it under my fleece and hat leaving no gaps for the cold air. For the very windy or cold moments I tie it all together with the hood from my waterproof jacket. I also recommend taking a thin balaclava for sleeping (see sleeping section) and a baseball hat if it is going to be very sunny.
Hands
When it’s really cold I wear two pairs of gloves, one a thin pair made of wool, and the other a thick, waterproof pair over the top. In Kosciuszko this wasn’t quite cutting it and I wish I had bought glove/mitt hybrids. Your hands will stay warmer with the fingers bunched together and the hybrids still allow for some dexterity.
If you plan to do some snow craft (making snow caves etc.) I suggest taking some spare waterproof gloves (can be washing up gloves or similar). Don’t use your primary warm gloves as you’ll likely get them wet. Spare gloves are a must. I pack a very warm, woolie pair that I sleep with and have as backup in case my primary pair get wet.

Experiencing the best of nature…
LOWER BODY
Underwear
I actually own a pair of MacPac marino wool underpants (there I said it). Marino wool is fast wicking and poses a natural antibacterial. This means they don’t stink after wearing them for several days. Best to take a wide birth if you see me out hiking….ask me how my pants are 🙂
Base Layer
A thick pair of thermals made of synthetic material are the best. I have some cheap Kathmandu thermals (I bought them before I knew better), something I felt were a bit light and will have to revisit at some point.
Mid Layer
Snow boarding pants or sallopetes offer a warm and waterproof? layer. Again check how waterproof they are before you leave and reproof them if necessary. I actually wear hiking trousers as well as sallopetes. I find sallopetes too warm when hiking, and no body want to see me walking in just thermals.
Shell
If you are certain temperatures won’t be high enough for rain or your mid layer is pretty waterproof, you can leave these behind.
Feet
The warmth of your feet is down to both good circulation and insulation. You will have far warmer feet if you can move your toes than you will wearing a restrictive second pair of socks. I suggest getting some really toasty ski socks and ensure your boots are big enough that you can still wriggle your toes.
The boots must be waterproof as you feet will get wet. This can simply be the result of melting snow from the heat of your feet. I wore a pair of waterproof socks (yes they exist) under my hiking boots and still got wet feet (not sure if it was sweat, or poor waterproofing). As my hiking boots are not very waterproof and my socks got wet, my feet were very cold. Thankfully I took several pairs socks so I could change them daily.
If your feet are cold I suggest taking your socks off in the tent and holding them with your warm hands. If they were really cold, like in my case, as they warm you will get an incredible burning pain. This is normal but not ideal. Best to keep them warm and dry in the first instance.
Buy either apres ski boots or waterproof hiking boots. Insulated hiking boots help a lot here but aren’t really great for summer. I’ve just bought myself a pair of North Face Flow Chute boots. There are amazing! Very waterproof, insulated, perfectly adapted to fit both snow shoes and gaiters (they are actually designed for this). I wore them last week on my last trip and my feet stayed dry and warm for the most part (they were only cold when standing around for a long time).
Long gaitors are also a must. They will stop snow from entering the top of your boots as you hike. There is not way to avoid this so you absolutely must get a pair. I have Sea to Summit Quagmire gaiters.
A great tip is to spray your feet with antiperspirant deodorant before setting off. It will massively reduce the chances of you getting blisters.
SLEEPING
Sleeping mat
Most of your body hear will be lost to the ground when camping so ensure you buy a good insulated sleep mat. I have a EXPED mat which is super warm and comfortable. It was an expensive purchase however I learnt my lesson after buying an inferior mat for the first outing. The MacPac mat I had purchased, spent a lot of its time deflated. As it was a blow up mat (not self inflating) the moisture in my breath and saliva had frozen around the intake valve. This meant the air would slowly leak and I had to blow the mat back up every few hours through the night. The Exped on the other hand, uses a clever hand pump mechanism meaning no moisture enters the mat, ensuring maximum performance from the insulation (yes it has some down in it) and no freezing issues.
Sleeping bag
Another expensive but important purchase. Again down insulation will provide maximum warmth. Get a sleeping bag rated to below the temperatures you are going to expect. The loft (quality of the down) and fill weight (how much is stuffed in there) are the important numbers that determine its temperature rating. The higher the loft and fill weight the better.
I have a MacPac Trekking Sleeping Bag Latitude 700 XP:
Comfort rating -4C, Limit of comfort -10C, Extreme -29C
Loft – 700
Fill weight – 700g
Total weight – 1.35kg
With a good mat, sleeping bag and tent there is no reason why you shouldn’t be able to sleep in only your base layer. For me I can’t say I’ve been very warm other than the night spent in Kosciuszko. I think this was largely down to the fact there were four of us in a tent. I’m still refining my technique on this one and will update this blog when I find the best solution. Last time I slept with my all my clothes on, a silk sleeping bag liner and was still a bit cold. Next time I think I’ll remove some of the layers and let the down do it’s job. Sometimes too many clothes in your sleeping bag will have an adverse effect.
Important: Don’t hide your head in your sleeping bag when sleeping. The moisture from your breath will reduce the effectiveness of your sleeping bag. I suggest purchasing a thin balaclava for sleeping and braving the cold opening with your face.
Tent / Bivi
Should I take a tent or a Bivi? Which tent to take? mmm that’s a tough one. The first trip I went on down to Tassie was bitterly cold (about -8C). Being my first trip and being on my own I had prepared for the worst hiring a 2 person 4 season tent. After hiking several hours with close to 30kg I got to my campsite for the evening. I was horrified to see the tent I had been given was a 3 season tent and only had a mesh interior. Thankfully there was not a breath of wind or I could have been in far worse trouble.
If there is likely to be snow and wind then you will need a four season tent. A four season tent is designed to support the weight of a heavy snow fall and will stop snow from blowing into the tent from underneath (4 season tent – high interior walls, a snow skirt or both). Weight is also a factor, if there are a few of you going the tent can be split up and the weight of a winter tent distributed.
A bivy bag a great extremely low weight alternative however imaging it is snowing heavily, raining, or windy and dark. Do really want to be stuck in a oversized bin bag for that long? I’m of two minds about it. I’ve only used a tent to date. They take some time to put up / take down, and are generally heavier. However they offer space to sleep, relax, store your gear, and even cook (if careful).
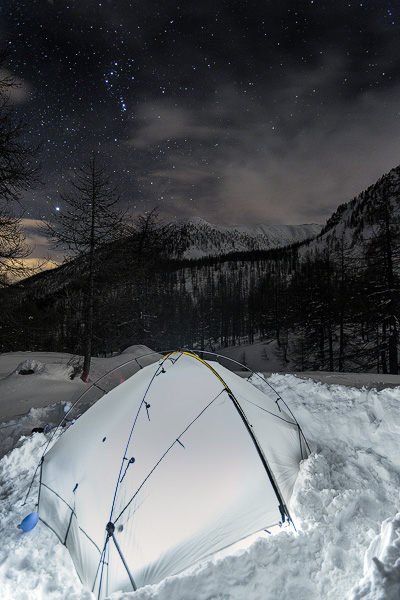
I have a Tarptent Scarp 2.
In winter configuration the weight is 2.43kg split between two. With little snow and wind it hasn’t had a real workout yet so I’ll keep you posted on its performance.
If taking a tent be sure to purchase snow pegs. Normal pegs won’t stick in snow meaning your tent is not securely anchored. I purchase MSR Blizzard Tent Stakes which seem to do the trick.
KIT LIST
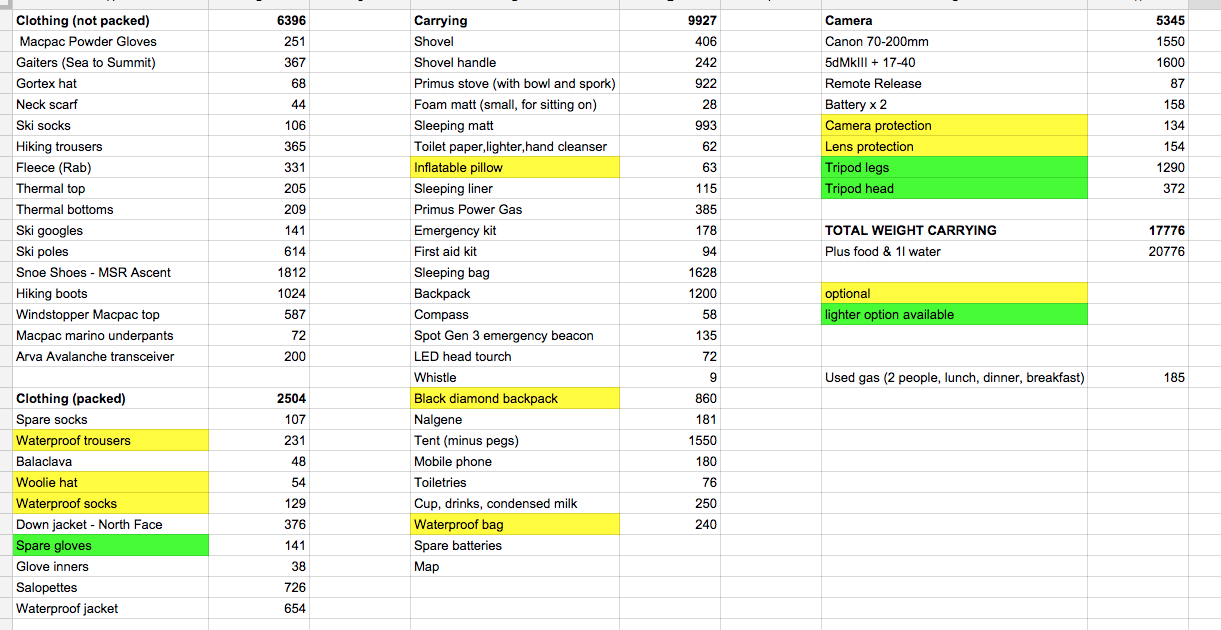
Here’s a spreadsheet of all the gear I took last trip. Creating the spreadsheet has been a very useful exercise allowing me to easily remember what I need to take, and what I can leave behind next time to save weight. With this in mind I have a few additional comments.
– Take sunglasses as well as ski googles. They are much more comfortable to wear if the weather is good. You will need at least something, snow blindness is a thing!
– Emergency kit includes knife, chemical hand warmers, emergency silver blanket, repair kit for sleeping mat, and water sterilisation tablets.
– Toiletries include tooth brush cut in half, small toothpaste, lip balm, earplugs, and sunscreen.
– Take an extra pair of socks. So if you think two pairs will be enough, take three.
– Take extra gloves.
– Take a wide neck water bottle such a BPA free Nalgene 1L bottle. The wide neck allows you to easily poor melted snow from the stove into the bottle.
– Take two or three plastic waterproof shopping bags (so no holes in the bottom). These are great if your boots get wet or if you have wet gear you need to carry.
– Everyone should carry a map. Best keep it in a plastic wallet sellotaped closed.
Take a closer look at my spreadsheet here, the second tab I was able to refine my kit list and save 5kg!

Counting the grams…then counting them again…
FOOD
The kits list is getting quite long and we haven’t even packed our camera gear. Weight is starting to become a factor so we need to conserve weight where possible. In comes dehydrated foods, found at all good camping stores. Why carry all that water up the mountain when there is plenty up there already? Plus anything with liquid will freeze!
Eating lots of calories is imperative when winter hiking. You can easily consume double your normal calorific intake, so no need to count calories here.
Warm porridge for breakfast is the perfect way to star the day. It’s a good balance of carbs and protein but can be a little tasteless. Add some Scroggin (nuts, raisins) and condensed milk to add flavour and calorific goodness.
For dinner there is a plethora of freeze dried meals available at the camping store. Alternatively stuffed tortellini takes minutes to cook and is a welcome meal after a days hike.
Depending on how long you are up the mountains for you may want to take some sandwiches for lunch (heavy) or more dehydrated food.
Having good, calorie rich food will help keep you warm through the night.
Snacks are an important source of calories whilst on the move. Be sure to buy or make your own Scroggin, which can be a mixture of almost anything (Google it). For me a mix of nuts and raisins is perfect. Also bring some chocolate and cereal bars.
For hot drinks hot chocolate, freeze dried coffee and tea is a must. All of them, several times through the day, yum!
Take more food than you actually need. You never know, you might just get stuck somewhere for longer than you expected.
SAFETY
Some words on safety. For a winter camping trip we should take the precautionary steps as we would with any other hike. The big difference with winter is that if you get stuck over night and you are not prepared there is a high chance you will not survive. Some simple but by no mean concise steps you should follow:
1. Tell someone what you are doing, where you are going (be precise), when you are going, when you plan to be back and what to do in an emergency.
2. Go with a buddy. If you hurt yourself, fall down a crevasse, get wiped out by an avalanche then at least you will have company! Oh and they can raise the alarm or help if need be.
3. Take an Epirb, or Spot. Both allow you to transmit and emergency signal via satelite, so you can get the message out even in the remotest locations. A Spot gives you some great added functionality like sending an all ok Check-In message, or pre programmed ‘I need help but I’m not in life threatening danger’ message to a friend with your co-ordinates.
4. Take a snow shovel, probe and a ARVA. These are basic mountain rescue tools that should be carried by everyone. Ensure you do some practice with the ARVA before setting off.
5. Don’t walk together. Walking 100m apart when in high risk avalanche area’s allows one of you to rescue the other if there is a problem.
6. Study maps and ask locals about the avalanche risks of your path.
Well that’s about it, I hope you enjoy your experience in the wilderness. Stay safe and enjoy! I would love to hear your thoughts on any aspect of this article or just leave a comment to say thanks 🙂
Resources
A fantastic article about staying warm when up in the mountains
21 Winter woodland wild camping tips


Good blog Lee. Really useful. Thanks. Although it doesnt get quite as cold in Aus, the principles are useful
Hi Mike, good to hear from you.
Yes I guess so, in that case I’m looking forward to some warmer winter camping!
Thanks for the great information Lee.
Mountaineering pants with built-in gaiters are also great. No hassle getting them on an off as they’re built in (but can be zipped off the inside of the pants easily).
I’ll let you know how the bivi snow camping goes. I’ve only used it in warmer conditions but looking to test it out this winter. It’s a Rab Ridge Master which is more of a soft coffin than an oversized bin bag. The fabric is well above your head so it doesn’t feel like you’re being smothered.
Hey Lewis.
Never heard of Mountaineering pants, sounds interesting. I kind of wish I had bought a similar bivi, one that fits my sleeping mat. They are a lot lighter than a tent, but their uses are a bit more limited. I may invest in one when I get back to Aus. Either way looking forward to some trips when I make it back to Aus (not for a while yet).